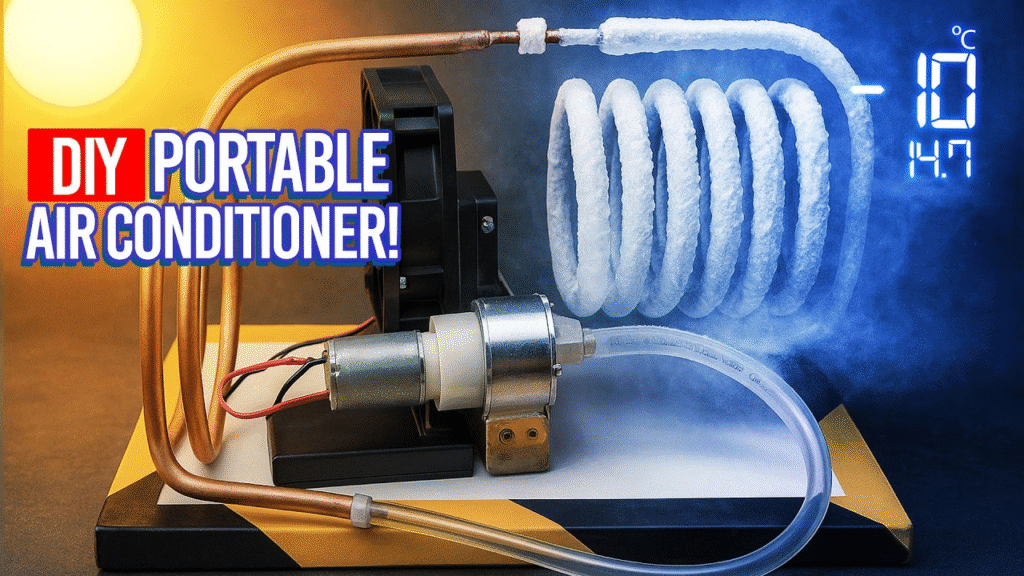
Now that we have the circuit assembled, we’re going to add a small and inexpensive 12-volt fan. We’ll mount it to the base next to the evaporator. Air will flow through the conduit. With this small 9-volt battery, it will be enough to start up our portable air conditioner, and we’ll be able to cool off during the hot summer nights. Check if it works, and yes, the pump activates when we turn on the battery. The heart of the system is the refrigeration cycle, and although it might seem complex, it’s actually based on a simple physical principle, using a gas that, when evaporating, absorbs heat from the environment. That gas is isobutane, and it’s going to be our ally in turning hot air into cold air. As you can see, the tubes freeze quickly, reaching minus 10 degrees Celsius. And the fan will blow a stream of cold air that will help cool any room in just a few minutes. Finally, there it is, minus 10. No more suffering in the heat this summer just because you can’t afford a commercial air conditioner.
1. ⚙️ Why build a DIY air conditioner?
Many homes—especially in regions like the UK or Cambodia—lack built-in air conditioning, and traditional AC units can be expensive to run. Simple DIY setups can offer significant cooling benefits when done correctly:
- Cost-effective: use everyday items like fans, ice, bottles, buckets.
- Low power consumption: fans use much less electricity than full AC units.
- Portable and easy to assemble.
- Great for personal cooling zones, dorm rooms, or heatwaves YouTube+6Tom’s Guide+6Popular Mechanics+6.
Note: These setups aren’t true refrigerant-based AC systems, and they work best in low humidity conditions. They typically reduce the temperature by 10–15 °C (20–30 °F) in a small area but can’t replace commercial air conditioning for whole-home cooling Homes and GardensThe Spruce.
2. Design A: Ice + Fan Method (Simplest, Fastest Setup)
🔧 What you’ll need:
- A desk fan (ideally an 8–10″ fan).
- A large bowl or tray.
- Ice cubes or frozen bottles (frozen water bottles work well).
- A stable surface.
🔨 How to build it:
- Freeze water bottles (at least 1 L). Fill them ~ ¾ and freeze.
- Place your fan on a stable surface near your resting spot (bed, chair).
- Put a bowl of ice or frozen bottles directly in front of the airflow, ideally level with the fan blade opening.
- Turn on the fan and let the airflow pass over the ice.
🧊 Why it works:
As the ice melts, it absorbs heat from the surrounding air. The fan circulates that chilled air, creating a localized cooling effect Homes and Gardens+3Tom’s Guide+3The Sun+3The Sun.
⚠️ Limitations:
- Cooling effect is temporary (ice melts; effect fades).
- Increases humidity—not ideal for very humid climates Homes and Gardens.
- Not whole-room effective—best for small personal zones.
3. Design B: Styrofoam Cooler (Bucket) Air Conditioner
🧰 Materials:
- A styrofoam cooler or 5-gallon plastic bucket with lid.
- A fan (inline or box fan).
- Ice packs, frozen bottles, or ice cubes.
- PVC tubing or small pipes (optional, for directed airflow).
- Duct tape or hot glue.
- Utility knife or box cutter.
- Insulation (optional) like styrofoam sheeting.
🔧 Build Instructions:
- Prepare cooler:
- On the lid, cut a hole matching the fan’s size.
- On sides near the lid, cut 1–3 holes (~2‑3″ diameter) for airflow exit.
- Insert short PVC tubing (optional) into these holes for directional flow.
- Install the fan:
- Fit the fan on top of the lid, blowing air downward into the cooler.
- Secure it flush using tape or glue for an airtight seal.
- Add ice:
- Fill the cooler with frozen bottles or packs and some water.
- If using insulation walls, line them with foam to reduce heat gain.
- Seal and operate:
- Close tightly and turn the fan on. Air passes into the cooler, chilling before exiting the side pipes or holes.
🌡️ How it cools:
The fan pushes warm air into contact with the ice, cooling and then pushing it out through side holes. This evaporative / conductive cooling effect refreshes the air quickly within small rooms The Spruce+2idealhome.co.uk+2reddit.com+9Homes and Gardens+9foxweather.com+9The Sun+3instructables.com+3instructables.com+3Tom’s Guide+1instructables.comreddit.comen.wikipedia.org.
✅ Advantages:
- More durable than simple ice/blob fan method.
- Can last for hours if you swap icepacks.
- Portable and inexpensive to build.
⚠️ Drawbacks:
- Still not for whole-house cooling.
- Ice melts eventually—you must replenish.
- Condensation can pool inside—place towel beneath or drain water.
- Works best in low-humidity environments The SpruceTom’s GuideHomes and Gardens+1.
4. Design C: Copper‑Coil + Water Pump Cooler
⚙️ What you’ll need:
- A small water pump (e.g. aquarium pump, 12 V low‑flow).
- A small fan.
- Copper or aluminum tubing (automotive transmission cooler coil or CPU heatsink).
- A cooler or insulated box.
- Optional: 12 V battery or solar panel power.
- Tubing, fittings, and ice water.
- Tools: screwdrivers, cutter, hot glue, tape.
🛠️ Step-by-Step:
- Create coil heat exchanger:
- Coil copper tubing flat to match the fan intake area.
- Attach the coil to the front of the fan so that air blows across the coil.
- Setup pump and cooler:
- Place water pump in cooler, filled with ice water.
- Connect tubing: pump → copper coil → return to cooler.
- Assemble unit:
- Mount fan + coil on top of cooler.
- Seal all joints to prevent air leakage.
- Power and operate:
- Provide power (battery or wall adapter).
- Turn on pump; water cycles through coil, cooling air blown across it.
🧊 Cooling Process:
Cold water circulates around the coil; warm air from the fan transfers heat to it, cools, then blows into room. The warmed water returns to cooler and is re-chilled by ice or more cold water. It’s like a miniature radiator cooling loop Popular Mechanics+2itsoverflowing.com+2.
🔍 Pros & Cons:
Pros:
- More efficient than bowl-of-ice method.
- Can cool for longer if ice stays cold.
Cons:
- More complex to build.
- Requires plumbing setup and possibly electricity.
- Still limited to small-space use.
5. Safety, Efficiency & Maintenance
🚧 Safety Tips:
- Avoid placing water or ice where it can drip near electrical components.
- Use properly insulated power sources, especially if using pumps or solar/battery.
- Ensure ventilation to prevent mold or moisture buildup.
- Do not expect a sealed cooling system—these setups rely on evaporation.
🧼 Maintenance & Best Practices:
- Replace or refill ice packs when they melt to maintain cooling.
- Drain accumulated water to avoid spills.
- Clean fans and tubing—dirty components reduce airflow and hygiene.
- In bucket or cooler systems, line interior surfaces with absorbent cloth or towels to catch condensation.
🏥 Health Considerations:
- These methods increase humidity, which can affect damp-sensitive individuals.
- Fans may circulate heat and particulates if filters or air input aren’t clean—wash or seal carefully The Sun+1The Sun.
- Evaporation coolers work best when outdoor air is dry (>50 °F dry bulb, low humidity) Homes and Gardensreddit.com.
- If humidity outside is high, this will limit cooling benefit—consider more airflow-based ventilation (open windows at night, block sunlight) theguardian.com.
6. Troubleshooting & Enhancements
| Issue | Potential Fixes |
|---|---|
| Cooling fades quickly | Rotate or replace frozen bottles; pre-chill more ice |
| Water leaking or pooling | Add towel/layer beneath setup; drain frequently |
| Fan not cooling enough | Use larger fan or multiple fans |
| Airflow weak | Ensure airtight seals; use PVC tubes to guide cool air |
| Too much humidity | Use in dry climate; ventilate periodically |
| Setup noisy or unstable | Secure fan and box; stabilize with rubber feet |
7. Real‑World Examples & Reddit Insights
- A Reddit user shared a bucket-based air conditioner: cut holes, insert frozen jugs, add fan—resulted in a 20–30 °F drop in a small room for up to two hours Homes and Gardens+2itsoverflowing.com+2Homes and Gardenstheguardian.comreddit.com+1reddit.com.
- Another posted a styrofoam ice-box + fan setup that worked for ~2 hours before refreezing was needed reddit.com.
- Someone built a small swamp-cooler style system using a cooler, mist nozzle, pump, and fan, achieving ~25% temp reduction for a single room instructables.com.
8. Enhancing Your DIY Air Conditioner
To stretch runtime and efficacy:
- Pre-freeze bottles several hours or overnight—juice bottles are great.
- Add reusable gel ice packs—rotate between freezer and cooler.
- Insulate your cooler or bucket exterior with foam to reduce melting speed.
- For bucket-style units, elevate slightly so airflow exits mid‑room height rather than cluttered floor level.
- Use a circulating fan in the room to distribute cool air more evenly.
- Consider a dual-fan setup (one to expel hot air, one to blow cool in).
- Allow for night ventilation cooling down your room, then run the DIY AC in the coolest hours for best effect theguardian.comHomes and Gardens.
9. Extended Use: Mini Swamp Cooler / Solar-Off-Grid Setup
If you want an off-grid version:
- Use a 12 V battery or solar panel to power a low‑flow fan + pump.
- Add a mist nozzle for evaporative cooling (a small spray that pre-cools ambient air) instructables.com.
- When designed correctly, this system can run independent of wall power—but works best in dry conditions.
10. Summary: Which Method Should You Choose?
| Method | Ease | Cooling Duration | Cooling Capacity | Recommended For |
|---|---|---|---|---|
| Ice + Fan | ★★★★★ | ≤ 1–2 hrs | Low (personal zone) | Quick cooling, minimal effort |
| Styro‐box / Bucket | ★★☆☆☆ | ~2–6 hrs | Moderate (small room) | Longer runtime DIY |
| Copper coil + pump | ★★☆☆☆ | ~2–6 hrs | Moderate-high (small room) | Best cold performance & airflow |
| Solar or battery pump + fan | ★☆☆☆☆ | Rotational | Moderate (small cabin) | Off‑grid/portable use |
11. Step‑by‑Step Quick Build: Styrofoam Cooler AC (template for ~1200–1500 words)
- Gather materials.
- Mark fan diameter on lid, trace and cut lid hole.
- Mark side cooling holes and cut out.
- Insert and seal PVC tubing for exits.
- Fit fan snugly into the lid.
- Pack cooler with frozen bottles and a bit of water (not overflowing).
- Seal lid, power the fan, and test airflow exits.
- Monitor temperature and rotate icepacks as needed.
- Add insulation for better performance.
- Clean and dehumidify periodically.
12. Final Thoughts
- DIY air conditioners are not replacements for real AC systems—but they offer meaningful cooling when needed.
- They are most efficient in hot, dry climates and with proper insulation/use.
- Safety first: avoid mixing water and electricity, and keep humidity under control.
- These systems are great for personal cooling, camping, disaster zones, or budget-conscious households.